Vinyl canvas art is a fun way to paint with the kids. Since we’ve started homeschooling, I’m always on the hunt for easy art education projects. Using my Cricut machine has allowed us to get a little more elaborate with our painting projects. Projects like an easy silhouette painting can be taken to the next level with help from Cricut!
This post is sponsored by Cricut.

EASY SILHOUETTE PAINTING
Whether your child has a more common name or one that is a bit less common, they probably like having customized things. Who doesn’t like seeing their name on things!
Making a simple silhouette painting using names is something I learned to do when I was teaching. We would use masking tape to block off the canvas and then let the kids start the painting.
We’ve used our Cricut Joy to do a variety of projects around our home including a DIY Kids Survival Kit for the car and DIY Family Command Center.
Cricut provided me with a new Cricut Explore 3 and I was excited to use it for our silhouette painting.

One of my favorite things about my Cricut Joy is using Smart Materials™. But the Joy is best for smaller projects. While a lot of the projects I do are on the smaller side, I have big dreams. The Cricut Explore 3 is the answer to the larger projects I dream of.
The Cricut Explore 3 works with the new Smart Materials™. If you’ve never used these, the load directly into the machine and stay aligned. There is no need to do any manual adjustment and you don’t need a cutting mat. There’s no material prep needed.
There are a variety of different Smart Materials available including:
For our silhouette painting, we used Smart Vinyl. Even though our painting projects aren’t huge ones, I love that with Smart Materials we can cut up to 12 ft at once! I’m already making plans for some bigger projects.

HOW TO MAKE SILHOUETTE ART FOR KIDS
Shop for the project right here:
- Cricut Explore 3
- Black Smart Vinyl™
- Cricut Transfer Tape
- Cricut Weeder Tool
- Cricut Scraper
- Acrylic paint and paintbrushes (You can try other types of paint too.) – Shop my favorite set on Amazon!
- Canvas or canvas boards
To get started, explore all of the fun fonts and clip art available in Cricut Design Space. I love having Cricut Design Space at my fingertips because it also makes it very simple to find something that will work for the project I want to do.

Once you have your project set, Design Space takes you step by step through loading the material, making the cuts, and unloading the material. You can make a silhouette painting with almost any design. Names are a common thing to use and my daughter wanted to do her name with colors of the ocean.
Since we’re homeschooling, I took the opportunity to explore her ideas about the colors of the ocean and we used those ideas to choose our paint colors. Then she found a font in Cricut Design Space to find a font she liked and we were ready to get started!

Design Space took us through loading the Smart Materials and making the cuts.
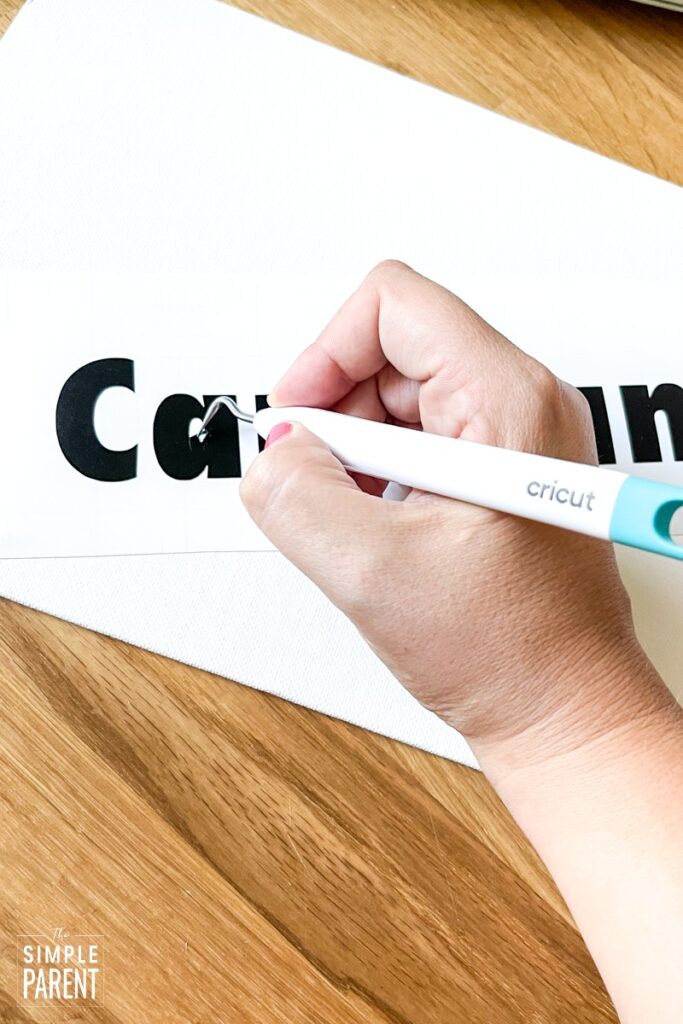
After you have your vinyl cut, remove the excess vinyl from the design. If you have other small pieces of vinyl that need to be removed, use the weeding tool to remove any small pieces of vinyl. If you’re doing a name or a word, you may have small pieces in certain letters.
Use Cricut Transfer Tape to get your vinyl off of the backing. Cover the design with the transfer tape, then use the scraper to run along all of the edges of your design. You want to make sure you get it all pressed down so when you pull the transfer tape off, the vinyl design comes with it. If you’re doing letters, be sure to get all of the edges so none of the letters stay on the backing or tear when you’re pulling up the transfer tape.
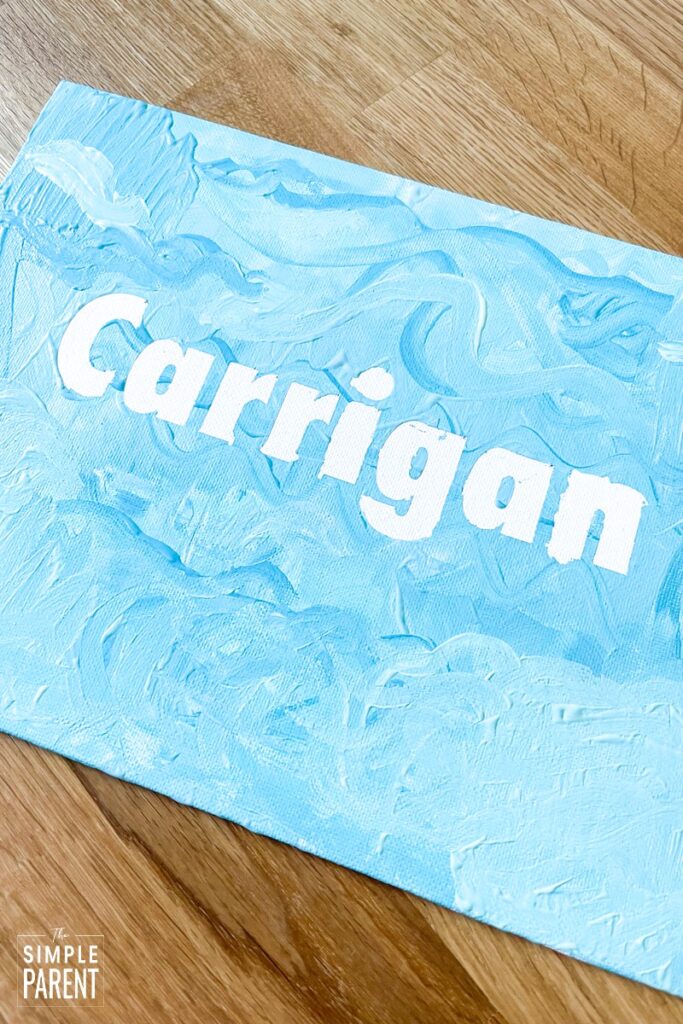
Then place your vinyl design where you would like it on the canvas. Remember that after you paint and you remove the vinyl, the design will be left in a white silhouette on your canvas.
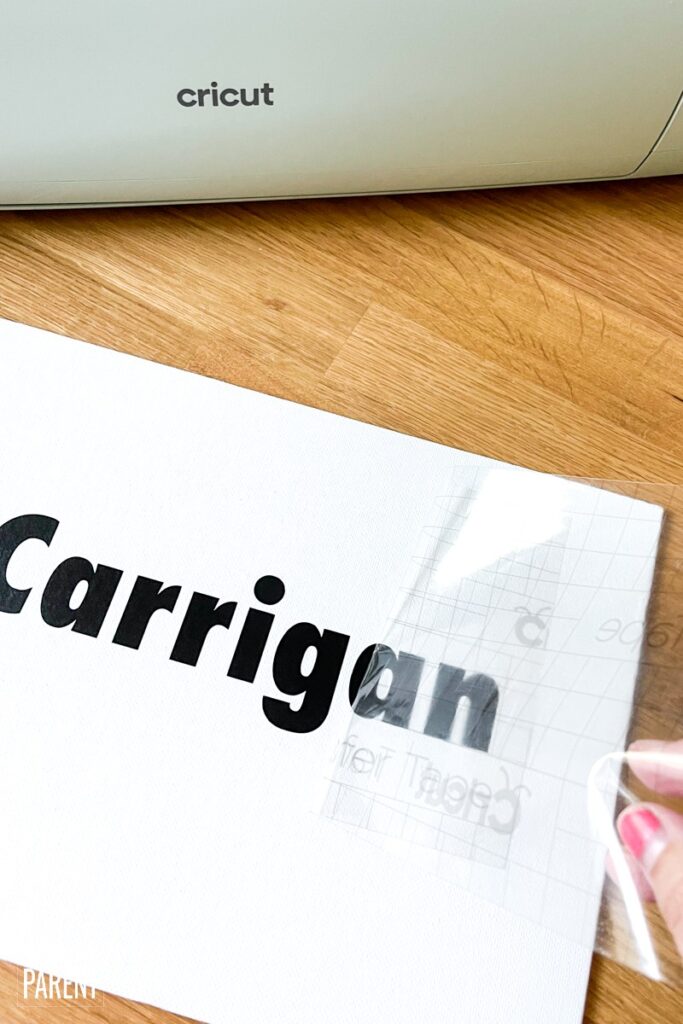
Repeat the smoothing of the edges so when you pull back, your vinyl design will be left on the canvas.
Once your vinyl is in place, your child can paint on the canvas. You can use acrylic paint or tempera paint. I’ve wanted to try watercolors too but we haven’t done that yet! Painting with different types of paint is another way to incorporate art education into crafting with your kids!

Because canvas is textured, you might find that the paint bleeds a bit along the edge of the letters. If you have time and want to do an extra step, you can seal the letters with Mod Podge before to help prevent this.

Once your kids are done painting, the vinyl needs to be removed while the paint is still wet. I recommend using fine tip tweezers to do this. The Cricut weeding tool can also be helpful when removing the vinyl from the painted canvas.
Allow the painted canvas to dry completely and then display the gorgeous new artwork!
If you want to incorporate more education into this fun painting for kids, you can explore some of the following concepts:
- Self Expression in Art (Art is a great way to help your kids express their feelings when they may not have the words.)
- Primary and Secondary Colors (There are many different topics to explore with color. You can learn specifically about the primary and the secondary colors. Then you can also explore color mixing and shading.)
- Different Painting Methods (Kids of all ages enjoy painting with different tools. Explore different paintbrushes, try sponges, use cotton swabs to do pointillism, etc.)
- Letters, Words, Numbers, Etc (You can cut vinyl words or letters and make art for all sorts of concepts. You don’t have to limit yourself to your child’s name. Consider themes like space or animals because Cricut Design Space has all sorts of designs you can use to cut your silhouette shapes.)
You can teach a lot through this easy silhouette painting and make beautiful artwork. We’re looking forward to doing this project again soon using some of the fun clip art in Cricut Design Space!
SHOP CRICUT NOW and then let me know how your project turns out!

Leave a Reply